Hi there.
I’m having difficulty beating this mission on hard difficulty and tried to find a walkthrough for it, but there were no one to be found. I’m now wondering if this scenario were even play-tested at all or of they just ramped up the difficulty without checking if the scenario is still completable. With the current state of the campaign AI, I’ve still been able to sweep through most of the maps without breaking a sweat. But this scenario seem to feature some straight up unfair game mechanics that seem disregarded. Following are some of the things making me raise my eyebrows regarding this scenario.
- I found that the spacing of enemy runners are manageable with correct micro but are somewhat inconsistent. Idk what could cause this as I’m not one who usually works with maps and scripts but one guess could be that the “great” AI or pathfinding in this game so far could be the culprit of this issue. Sometimes the riders would appear with as much as 20 seconds delay while they in some cases ride right next to each other. This unpredictability was somewhat annoying but as stated earlier: manageable.
- After heading south a second time I found there to be quite a distance in between the campfires. So far in fact that most of your units (all but the musketeers and heroes) are not able to make the run between them without freezing to death. They go from 100% hp (including the hp buff able to be picked up in one of the treasure chests) to 0% even if rightclicked from the first campfire straight to the next. (How you are supposed to cross this distance without letting a single runner reach the boneguard army is beyond me)This to me seems like quite an oversight and maybe the fault some difficulty scaling. But tbh I have no idea how that works so I’m gonna leave it for now.
- After losing two thirds of my army, whilst for the second time making my way down south, my few remaining men made their way through the next shortcut and prepared to move out north again. At this point I simply gave up on trying to stop the messengers as I now lacked the firepower to kill them without a hero ability. Before going on northwards I however found a treasure containing exp laying right next to a campfire and I thought that I might as well stop and clear it as the boneguard army were still making their way up the second northbound section of the map. After clearing the chest I noticed my five remaining units were low on help and I decided to let them rest before continuing north. As I waited and waited I however noticed with fear in my eyes that my units did not seem to heal. The campfire was broken and no matter where in the cave they were, moving or standing still, they did not get healed. I even tried having some of them leaving and reentering the cave but they still could not be healed. This was the final nail to my coffin. The final drop of water which made my bowl of frustration flow over. And so I pressed my dearest alt+f4 keys and started searching the internet for help.
I would love to read if anyone else’s experience of this scenario on hard (impossible) difficulty is similar, better or worse to mine or if anyone has some mindblowing tips for me.(Because i’m quite frankly out of ideas on how to beat this map without going insane)
B.R.
P.S.
Sorry for the long rant-post. here’s a potato for your time:

Another thing I just thought of.
4. KÀ:NIEN mentioned something about that if you stopped the riders, the boneguard army would not be able to move forward. I found this to be a lie as they proceeded to chase me even though no messengers were allowed to pass me by
I dodged this mission first time beacuse there was a bug in a specific firepit that didnt heal.
This post motivated me to complete it(the bug is still present btw) and here’s what I did:
-
Use Amelia and Kanyeke to scout the map and look for scouts (given their high hp and mobility, they’ll be able to cover ground quickly without little to no risk of dying).
-
Grab these treasures in particular, those will bolster your troops making them more effective at killing scouts
-
Try to not lose many soldiers. If you lose too much soldiers at the earlier stages of the game, you might want to restart beacuse, they are essential at stopping scouts (A single volley of your starting army can almost onehit a cav archer).
-
Save often. Sometimes a scout will slip through or a stray Ulhan might kill too many troops.
-
I recommend setting up 2 control groups (one for the Heroes and other for your troops).
This is my walkthrough of this mission:
- Leave your troops in the top refuge, while Amelia and Kanyeke clean out wolves and cougars, when Amelia and Kanyeke reach the green circle you can start moving your troops to the Yellow circle, when no scouts are on sight you can start moving them to the green circle.
I recommend saving when:
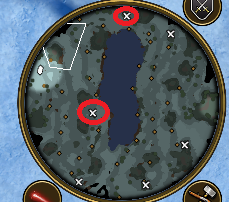
- Everyone reaches the red circle
- You get rid of cougars and wolves blocking the path
- Amelia and Kanyeke reach the green circle refuge
- Your troops reach the yellow circle
- Your troops reach the green circle
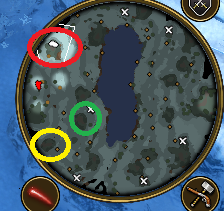
2.In this part the procedure should be like this:
- Your army must stay behind near the red refuge
- A & K (I will use to describe Amelia and Kanyeke from now on) should move to the yellow circle
- Army moves to the yellow circle
- A & K go to green circle
- Army goes to green circle (I recomend saving here)
By this point you should’ve collected the two marked treasures from earlier
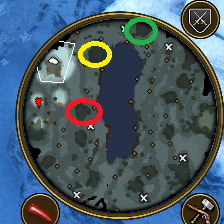
- At this stage I’d recommend leaving your troops on the red circle for the rest of the mission (They’re essential for stopping scouts).
- A&K should advance alone (going through the marked green circles)
- Careful when reaching the first red circle, 3 cavalry archers will spawn and you’ll need A&K crackshots to be up (so your army will only have one scout to deal with).
- From this point on you can start ignoring scouts and rush through the last set of refuges.

Here’s some gameplay of someone who played this mission as well
4 Likes
Alright thank you StoneyKhan14558. You inspired me to at least give it another go sometime in the near future. I usually dislike using saves but I guess I will let it slide for this mission.
I do have one follow up question before going back in though. I don’t remember seeing those three cav archers you mentioned at the red circle. Is it possible you mean later in the scenario and that I just didn’t reach that area yet?
Anyway once again thank you for the detailed guide 
Whoops my bad, I meant to say Green circle (specifically talking about the bottom one), after some time 3 cav archers will spawn in rapid succession.
Hope you can succeed on this mission!
1 Like
Thanks for this, awesome guide. This mission was driving me insane. Now I even managed to get the secondary objective.
2 Likes
