In this scenario, you will have to defend a lone Monastery at the base of a canyon. You will have to rely on the use of towers and various ranged units to prevent the waves of enemies from reaching the Monastery. Can you defend the Monastery and hold out until the last enemy wave has been vanquished?
This map contains a lot of unique features designed to enhance the replay value. There are multiple strategies that can be utilized to play this map. It was designed to be challenging, but beatable. Please read through the details below to learn about them.
.
Features:
~BASIC INFORMATION
- Theme: You play as the Britons defending a lone Monastery from Viking invaders. (You will have access to non-Briton mercenaries.)
- Much of the setup is fixed–you will only be able to build tower defenses and basic economic buildings.
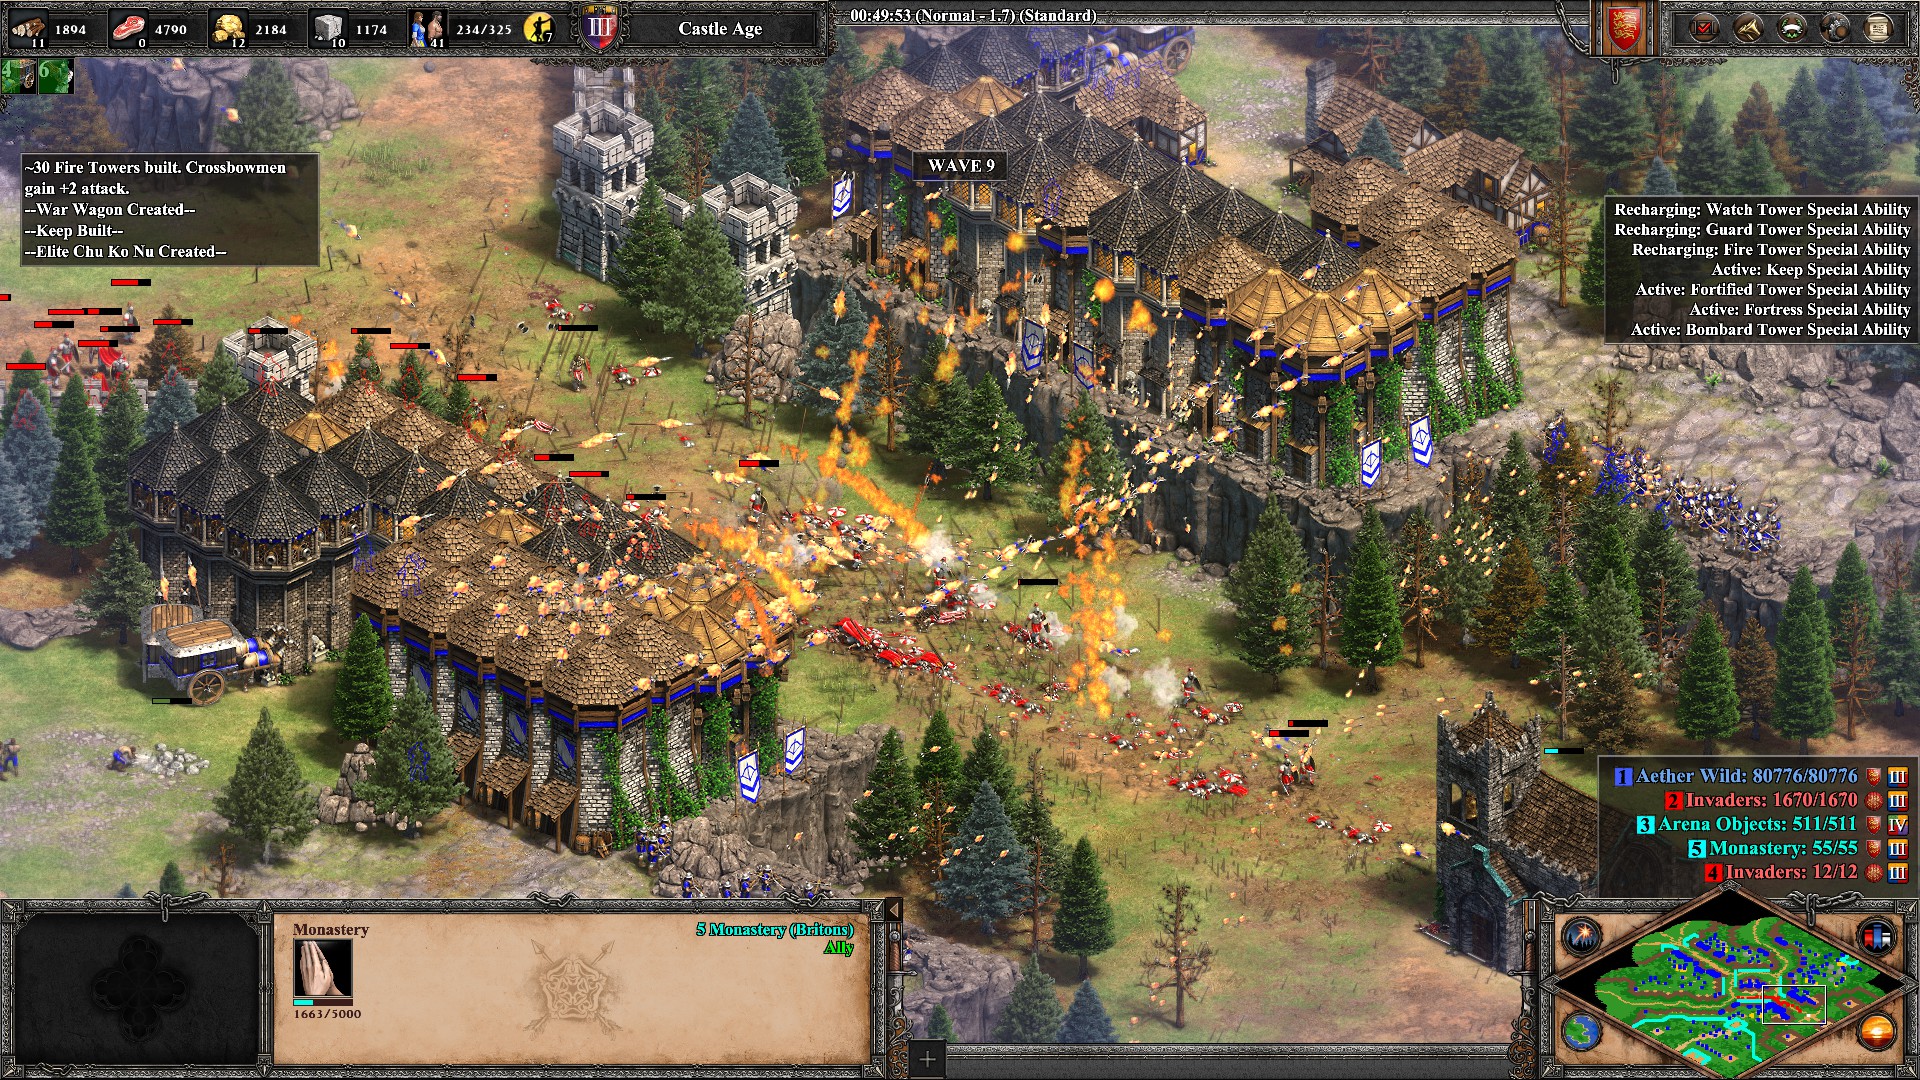
- There are six unique towers available to you, plus a single pre-built Castle and two Fortresses.
- The South-most part of the map is a secured area that features the tower and unit special abilities, which can be activated by garrisoning your lone Pikeman into the respective buildings. (Your Pikeman starts in front of your lone Krepost.)
- Enemies will come in waves, and you only have access to the clifftop areas, so you will not be able to respond with melee infantry and cavalry.
- Enemy units consist of Men-at-Arms, Norse Warriors, Berserks, Woad Raiders, Huskarls, Elite Huskarls, Light Cavalry, Knights, and Cavaliers.
- AI: The enemy player operates without an AI. All waves have been programmed, so having an AI would actually disrupt the design.
- Total game-time per match is estimated to be around an hour.
.
~WAVES:
- There are 10 waves, plus a Boss Wave.
- The first wave begins at the 3 minute mark.
- Each wave grows increasingly more difficult. Enemy units will gain speed, hitpoints, and/or armor buffs.
- Each wave lasts 3 minutes; the time between each wave is 1 minute.
- Enemy units will come from one of the three paths, or all three paths. (This is programmed, not randomized.)
.
~TOWERS & DEFENSES:
- Watch Tower:
- Manned by marksmen
- Long range, high damage, slow attack
- Strong versus slow troops, infantry
- Weak versus fast troops
- The Arrowslits upgrade can be found here. Arrowslits can be researched infinite times. (Warning, each research increases unit hitpoints by 25.)
-
Special Ability: (120 second recharge time)
- Watch Towers: Increased firing rate, range, and attack for 60 seconds
- Archers: Increased attack rate and arrows loosed per attack; 60 seconds
- Guard Tower:
- Manned by axe throwers
- Short range, splash damage, fast attack
- Strong versus groups of units
- Weak versus fast units
-
Special Ability: (120 second recharge time)
- Guard Towers: Increases firing rate significantly and enables the ability to train Elite Throxing Axemen for 60 seconds
- Fire Tower:
- Short-medium range, splash damage, very fast attack
- Strong versus groups of units
- Weak versus fast units
-
Special Ability: (120 second recharge time)
- Fire Towers: Increased fire volume, damage, and splash damage radius for 60 seconds
- Crossbowmen: Crossbows turn into rapid-firing stone launchers for 60 seconds
- Keep:
- Shoots volleys of arrows
- Medium range, moderate damage, normal attack speed
- Balanced strength/weakness: decent against all units
-
Special Ability: (120 second recharge time)
- Keeps: Increased attack and volley to 30 arrows per tower for 60 seconds
- Longbowmen & Elite Longbowmen: Increased attack rate for 60 seconds
- Fortified Tower:
- Launches ballista bolts
- Long range, deals pass-through damage, medium attack speed
- Strong versus units grouped together or in a line
- Weak versus fast troops, and units moving perpendicular to the tower
-
Special Ability: (120 second recharge time)
- Fortified Towers: Increased firing rate and range for 60 seconds
- Arbalesters: Doubles attack rate and enables explosive fireball projectiles for 60 seconds
- Bombard Tower:
- Moderate range, deals massive single-unit damage, normal attack speed
- Strong versus slow, single unit targets
- Weak versus most moving targets, especially those moving perpendicular to the tower
- The Arquebus and Artillery upgrades can be researched here.
-
Special Ability: (120 second recharge time)
- Bombard Towers: Increase firing rate and attack, and gains a splash attack with increased blast radius of 2 for 60 seconds
- Hand Cannoneers and War Wagons: Gain increased attack rate for 60 seconds
- Fortress:
- You begin with two defensive Fortresses and cannot construct more. They have long range and can reach the Monastery, but have scarce coverage.
-
Special Ability: (120 second recharge time)
- Fortresses: Increases firing rate, attack, and volley of arrows to 64 for 60 seconds
- Bonus 1: Gain access to two long-range Heavy Scorpions for 60 seconds.
- Bonus 2: After activating the special ability for the first time, your Fortresses will gain full defensive coverage of the Monastery.
- Castle:
- You begin with one central Castle and cannot construct more. This defensive building houses powerful Elite Longbowmen and crucial technologies.
- The Sappers Traps special ability can be found here.
- After Wave 6, Elite Chu Ko Nus can be trained here.
- Krepost:
- You begin with only one Krepost and cannot construct more.
- For the first two minutes of the game, you can garrison your Pikeman here to activate the Auto-Task Villagers ability. This one-time-use ability will automatically task all of your villagers to work.
- After the first two minutes of the game has progressed, you will receive a chat notification indicating that the role of the Krepost has changed to enable the Auto-Heal Monastery ability.
- The Auto-Heal Monastery ability will enable auto-healing of the Monastery at a rate of 5 hitpoints per second for 60 seconds (a total of 300 hitpoints). (This ability will enable you to restore hitpoints over the 3500 hitpoint threshhold. See additional details under Repairing the Monastery below.)
- Recharge time for the Auto-Heal Monastery is 120 seconds.
- Negative Effect: Each time you use this special ability, enemy units will gain +1 attack.
- Outpost:
- You start with 20 Outposts. Your archers refuse to work in such poorly constructed towers, so instead of adding a defensive advantage, they can be torn down and used for scraps.
- Tip: You can destroy Outposts and gain 25 Wood and 25 Stone from each.
- Pro Tip: There is a delay between destroying an Outpost and gaining the reward. If you destroy multiple Outposts at a time, you may only receive resources from one.
.
~TOWER COSTS:
-
Watch Tower:
50 Wood, 100 Stone -
Guard Tower:
100 Wood, 125 Stone -
Fire Tower:
100 Stone, 125 Gold -
Keep:
150 Wood, 150 Stone -
Fortified Tower:
250 Stone -
Bombard Tower:
150 Stone, 150 Gold
.
~UNITS
GARRISON/SPECIAL ABILITY UNIT:
You will start the game with a single Pikeman that can be garrisoned in one of the defensive structures at the South-most area of the map. Your Pikeman’s only purpose is to activate special abilities.
ARCHER-CLASS UNITS:
- Archer:
- Strength: Cheap
- Weakness: Slow to train, low damage output
- Special Ability: (Watch Tower) Gains 2 arrows per attack and shoots faster for 60 seconds
- Crossbowman:
- Strength: Moderate-high damage output
- Weakness: Slower reload time
- Special Ability: (Fire Tower) Gains rapid-fire attack for 60 seconds; attack is less accurate, but effective against groups of enemies
- Arbalester:
- Strength: Very powerful attack
- Weakness: Long reload time
- Special Ability: (Fortified Tower) Launches explosive fireballs with an increased rate of fire for 60 seconds
- Longbowman:
- Strength: Long range
- Weakness: Moderate damage output
- Special Ability: (Keep) Attacks three times faster for 60 seconds
- Elite Longbowman:
- Strength: Longest range archer unit available
- Weakness: Moderate damage output
- Special Ability: (Keep) Attacks four times faster for 60 seconds
ARCHER-CLASS UNIT BONUS: All archer-class units gain +1 damage upon completion of each wave (except Chu Ko Nu).
.
BONUS UNITS:
- Elite Throwing Axeman:
- Strength: High melee damage at range, very fast train time
- Weakness: Only trainable upon activating the Guard Tower special ability; difficulty hitting units moving perpendicular to them
- Hand Cannoneer:
- Strength: Very powerful attack
- Weakness: Slow attack speed, very slow train time
- War Wagon:
- Strength: Very powerful splash attack (fires cannonballs)
- Weakness: Expensive; slow attack speed; very slow train time
- Elite Chu Ko Nu:
- Strength: Rapid-shooting crossbow (10 arrows per volley)
- Weakness: Difficult to mass, does not gain damage buffs like other archer units
- Available upon completion of Wave 6
- Hwacha:
- Strength: Fires 100 arrows per volley
- Weakness: Slow reload time
- Available upon completion of Waves 7, 8, and 9 (automatically receive 2 per wave completion)
- Heavy Scorpions:
- Strength: Massive range, heavy pass-through damage
- Weakness: Only two are available while the Fortress special ability is active.
.
~UNIT COSTS:
-
Archer:
25 Wood, 15 Gold -
Crossbowman:
35 Wood, 35 Gold -
Arbalester:
25 Wood, 85 Gold -
Longbowman & Elite Longbowman:
35 Wood, 40 Gold -
Elite Throwing Axeman:
55 Food, 25 Gold -
Hand Cannoneer:
45 Food, 50 Gold -
War Wagon:
220 Wood, 220 Gold -
Chu Ko Nu:
40 Wood, 35 Gold
.
~SPECIAL ABILITIES:
- Each special ability, except for the Sappers special ability, can be activated by garrisoning your Pikeman into the respective tower at the South-most area of the map.
- Each special ability lasts for 60 seconds.
- The recharge rate for all special abilities is 120 seconds.
- For details pertaining to each tower special ability, see the tower descriptions above.
OTHER, NON-TOWER SPECIAL ABILITIES:
- Sappers Traps Special Ability
- Upon researching the Sappers technology at the Castle, traps will appear on the path surrounding the castle and leading to the Monastery.
- Traps will remain in position for 60 seconds, dealing 17 damage per second to any enemy units who walk over them.
- Traps will also severely degrade the pierce armor of units that pass over them (rate of -1 pierce armor per second).
- This special ability can be reused an infinite number of times. (120 second recharge time)
- Death Star Secret Ability
- Despite describing this as a secret ability, I am going to explain how to access it anyway. I considered leaving it a secret, but the chances of accidentally unlocking it may vary.
- Upon researching the following technologies, you will unlock this secret ability.
- Ballistics
- Bracer
- Chemistry
- Artillery
- Arrowslits (x7)
- Stronghold (x6)
- Yeomen (x5) - When this ability is unlocked, it will outfit your Castle with a defensive weapon worthy of conquering the galaxy.
- Your Castle will also be able to train soldiers with similar technology.
- NOTE: While this secret ability may vaguely sound like a cheat, it actually isn’t. Unlocking this ability will actually create a more challenging experience.
.
~POWER UPGRADES:
- Yeomen: (research at Castle)
- Increases range of archer-class units
- Increases tower attack by +2 (including Fire Towers, Fortified Towers, and Bombard Towers)
- Can be researched infinite times
- Negative Effect: Increases enemy unit HP by 50 per research
- Stronghold: (research at Castle)
- Increases attack speed of castle and towers by 20% (does not affect Fire Towers, Fortified Towers, and Fortresses)
- Can be researched infinite times
- Negative Effects: Increases enemy unit HP by 100 per research
- Arrowslits: (research at Watch Tower)
- Increases tower attack by +1 (does not affect Fire Towers and Bombard Towers)
- Can be researched infinite times
- Negative Effect: Increases enemy HP by 25 per research
- Arquebus: (research at Bombard Tower)
- Enables ballistics for Bombard Towers and Hand Cannoneers
- Unlocks Hand Cannoneers (trainable at Bombard Towers)
- Artillery: (research at Bombard Tower)
- Increased range for Bombard Towers
- Unlocks War Wagons (trainable at Bombard Towers)
.
~SYNERGY BONUSES:
- Fortified Towers:
- Upon researching Ballistics and Artillery, the effects of Ballistics and Torsion Engines will affect Fortified Towers
- Bombard Towers:
- Upon researching Arquebus and Artillery, Bombard Towers will gain a splash damage effect with a radius of 1
- Fortified Tower Special Ability + Fortress Special Ability:
- Gives Heavy Scorpions increased rate of fire while both abilities remain active
.
~REPAIRING THE MONASTERY:
- You can repair the Monastery by selecting it. It must remain selected to repair. Deselecting the Monastery will stop the repair.
- Repairing costs 15 Wood for every 15 hitpoints. The Monastery will repair at the rate of 15 hitpoints per second.
- The repair limit is 3500 hitpoints. If you have researched Masonry, the hitpoints will increase to 5000. However, if the Monastery is damage below 3500, you will only be able to maintain repairs up to 3500 hitpoints.
~MASONRY:
- The Masonry tech will affect the Monastery. However, it will boost it’s hitpoints by 1500; building armor will not be affected.
- If the Monastery has been damaged prior to researching Masonry, it will become fully restored.
.
~TOWER CONSTRUCTION BONUSES:
You will gain unit bonuses for building the specified number of each tower. However, for each milestone you reach, enemy units will gain +15 hitpoints.
-
Watch Towers Built:
25: Archers +1 pierce attack, +1 arrow
35: Archers +1 pierce attack, +1 arrow
45: Archers +1 pierce attack, +1 arrow
55: Archers +1 pierce attack, +1 arrow
65: Archers +1 pierce attack, +1 arrow
75: Archers +1 pierce attack, +1 arrow -
Guard Towers Built:
10: Throwing Axemen +1 melee attack, +1 range
15: Throwing Axemen +1 melee attack, +1 range
20: Throwing Axemen +2 melee attack, +1 range
25: Throwing Axemen +2 melee attack, +1 range
30: Throwing Axemen +3 melee attack, +1 range, gain splash attack
35: Throwing Axemen +3 melee attack, +1 range, increased attack rate (x2) -
Fire Towers Built:
15: Crossbowmen +1 pierce attack
20: Crossbowmen +1 pierce attack
25: Crossbowmen +2 pierce attack
30: Crossbowmen +2 pierce attack
35: Crossbowmen +4 pierce attack
40: Crossbowmen +4 pierce attack -
Keeps Built:
15: Longbowmen & Elite Longbowmen +1 pierce attack
20: Longbowmen & Elite Longbowmen +1 pierce attack
25: Longbowmen & Elite Longbowmen +2 pierce attack
30: Longbowmen & Elite Longbowmen +2 pierce attack
35: Longbowmen & Elite Longbowmen +2 pierce attack
40: Longbowmen & Elite Longbowmen +3 pierce attack, increased attack rate (x2) -
Fortified Towers Built:
5: Arbalesters: +2 pierce attack
10: Arbalesters: +2 pierce attack
15: Arbalesters: +2 pierce attack
20: Arbalesters: +4 pierce attack
25: Arbalesters: +4 pierce attack
30: Arbalesters: +6 pierce attack -
Bombard Towers Built:
5: All other defenses +1 attack, Hand Cannoneers +1 range
10: All other defenses +2 attack, Hand Cannoneers +1 range
15: All other defenses +3 attack, Hand Cannoneers +1 range
20: All other defenses +4 attack, Hand Cannoneers +1 range
25: All other defenses +5 attack, Hand Cannoneers +1 range
30: All other defenses +6 attack, Hand Cannoneers +1 range
.
~NEGATIVE EFFECTS / ENEMY UNIT BUFFS:
Although indicated throughout the above details, I am compiling the list of negative effects here so as to eliminate any confusion. Negative effects are those that affect the enemy units instead of your own units and defenses.
- Researching the following technologies will give enemy units an HP buff each time they are researched, on top of the intended effects of each technology:
- Arrowslits: Gives enemy units +25 HP
- Yeomen: Gives enemy units +50 HP
- Stronghold: Gives enemy units +100 HP
- Activating the following special abilities will give enemy units an attack buff each time it is activated, on top of the intended effects of each special ability:
- Krepost Auto-Heal Monastery: Gives enemy units +1 melee attack
- Reaching tower construction milestones will give enemy units a +15 HP buff, on top of the intended effects of each milestone reached.
- Enemy units will receive HP, pierce armor, and/or speed buffs for each wave defeated.
.
~ECONOMY:
- You begin the game with 41 idle villagers.
- You will not be able to train additional villagers.
- You can auto-task your villagers by garrisoning your Pikeman in the Krepost within the first 2 minutes of gameplay.
.
~DIFFICULTY LEVELS:
Difficulty level affects only the starting resources, starting towers, and population cap. There are only three difficulty levels for this scenario.
-
Easiest: You will start with 5000 of each resource, two additional Watch Towers near the Monastery, and the available population cap is set to 360.
- The resources are set higher to enable a faster defensive start. This difficulty is good for casual play. I designed it for my younger sons to play, but did not want to eliminate the challenge.
- Standard: You will start with 2000 Wood, 1500 Food, 1500 Gold, and 2000 Stone, no additional towers, and the available population cap is set to 325.
- Moderate, Hard, Hardest, & Extreme: You will start with 1500 Wood, 1500 Food, 1000 Gold, and 1500 Stone, no additional towers, and the available population cap is set to 300.
.
~EXPLOIT CONTROL:
Special Abilities:
- You will not be able to train Elite Throwing Axemen, Hand Cannoneers, and War Wagons in the designated special ability towers located in the secured area at the South-most part of the map. If you attempt to do so, any trained unit in that area will immediately die. This was done to prevent players from exploiting the special ability timers. Your Pikeman will have to work very hard to meet your special ability demands!
Cheat Codes:
- I have not implemented any triggers that will prevent players from using cheat codes. Some players may find joy in using resource cheat codes to get the upper-hand, if they find the scenario too challenging for them. I do encourage players to play and win the scenario without cheat codes.
.
~KNOWN ISSUES:
Idle Enemies, Confused Enemies, “Dancing” Enemies, Enemy Mosh Pit:
- Sometimes enemy units will suddenly decide to pile up within the canyon and either remain still or dance in place. It appears to be a path-finding issue. This does not occur during every play-through, and I have utilized triggers and specialized design strategies to minimize this activity. I have seen this occur a few times during several hours of recent play-testing, but it seems to be rare. But it could still happen. It seems to happen more often when Bombard Towers are present. If it does happen, just mow the idlers and dancers down and press on. (But seriously, if it happens more frequently for you, please let me know and give details so I can address it. I would prefer to eliminate it completely, if possible.)
Lagging Graphics for Slow Computers:
- If you’re running a slow computer, you may well run into this issue. As you reach the late game (post Wave 6, Wave 7), you are going to have a lot of projectiles flying around on your screen. It will only increase as you reach the final waves. I currently have not implemented a method to improve performance for slower computers in this scenario. I may add such a feature if the demand is high enough. (Yes, it is possible for me to add a system using triggers to improve the scenario experience for players with slower computers, but it will be time consuming.)
.
~TIPS & STRATEGY:
If you are having difficulty getting ahead in this scenario, here are a few tips and strategies that may help you:
- Ballistics is probably the most valuable early game technology.
- Watch Towers have great range and can be placed further back to allow other towers to see the show.
- Guard Towers will compete with the Fire Tower for best placement due to their low range. Because Guard Towers have the shortest range, they should get first pick for close positions in some situations.
- Fire Towers can be as mighty as dragons in the late game.
- You found your favorite tower? Don’t get too attached. A good mix of towers adds a better killing variety.
- Each wave lasts 3 minutes. Each special ability lasts 1 minute, but has to recharge for 2 minutes. Math can be fun. Good timing can be rewarding.
- Those Arbalesters are quite powerful. Maybe too powerful. Even the local priests might condemn their special ability.
- I hear the local priests already condemned the local artillery engineers for exploding their powerful cannonballs so close nearby…
- Learn to weigh the benefits of the techs Arrowslits, Yeomen, and Stronghold against their negative effects. Having more sounds better, but you should be cautious not to tip the scale.
- Do not underestimate the destructive abilities of your Sappers. They will become especially useful in the late game.
- Remember the synergies.
- Try to reach as many tower construction milestones as you can. The unit buffs could become tremendously useful.
- Having many builders can get towers up quicker, but many gathers makes for more towers in the long run.
- Fortified Towers are best positioned where their pass-through bolts can be focused down the enemy’s path.
- Having trouble getting your units to stay focused on the bigger picture? Are they getting too attached to their targets? Teach them how to defend their ground with a stance of higher patience.
- You won’t be able to construct towers on rock terrain. No worries though. Your units love gathering on rock terrain.
- Some units may require the assistance of Yeomen to be more effective.
- Imagine having a squadron of Crossbowmen at one of the major choke-points and then suddenly their crossbows transformed into machine guns. Man, that would be awesome!
- If you can hold off from researching Masonry for as long as possible, its effects could be like gaining a second Monastery.
- Prioritize towers or prioritize units? Finding the balance is all part of your preferred strategy. Both have their strengths. Both have their weaknesses.
- The road segments on the tops of the cliffs are only suggestive tower placement locations. You can place towers freely atop the cliffs. The suggestive tower placement locations will not provide any type of bonus for building towers on them.
.
~FEEDBACK:
Please leave feedback. Tell me whether this scenario was too hard, too easy, not challenging enough. Tell me what I can do to improve it. I am considering making additional tower defense maps using the same mechanics, so feedback would absolutely help.
.
~SCREENSHOTS:


.
~Change List:
2020-06-23: Nerfed the Death Start Secret Ability. The range of the “Death Star Castle” was long enough that it could destroy the Monastery while trying to defend it, as shown at the end of the below YouTube video:

 )
)